Saturday, December 24, 2011

SBF# 16 The Art of Transition

Transformation from a Transitioneer.

The idea of renovation these days is perhaps not very fashionable, but is certainly considered more desireable in terms of achieving lesser developmental impact. I will also argue that the outcome of a renovation can hold a much more rich feeling in terms of character and energy.

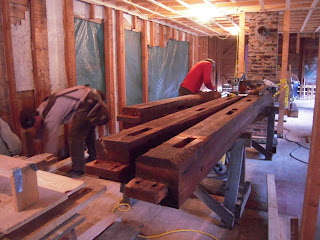
Below you can see the dismantling of the newer half of the barn, recutting it to fit into its new home in the house, and its new place, replacing some of the load bearing walls to create an open floor plan for the dining/kitchen area.


So how do we look and renovation from an ecological perspective. I will briefly outline my process.

First the concept and idea, to transform the old farmhouse into a new home for Transitioneers(http://en.wikipedia.org/wiki/Transition_Towns).

Then it is crucial to have and apply goals:
A place that relies on its local resources gently.Build on/with what we have.
A place that is connected to its ecology greatly.
While these goals may seem simplistic, far too often, goals are not articulated or referenced with regard to major decisions. The resulting decisions often become relegated to the bottom line short term economics or personal whim.

There are many management processes that can be applied to the process. I will suggest holistic management practices as a starting point.(http://en.wikipedia.org/wiki/Holistic_management)
Any process must utilize feedback.

This framework allows me to proceed in transforming a place in an efficient way. Because the process is dynamic, there is a constant need to reassess and question where things go to next and how to make it happen.

Jan had a great idea to map where the original parts of the farmstead started and how they were reused, reintegrated with the renovation. Or not.
Below are a few elements that would be on the map.

Here is the original threshold, 
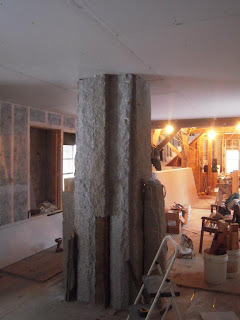
flopped onto the ground from its place on top of the foundation. This was removed when we took off the south sun room that was not part of the original house, and made the front door into a window.
This granite slab was sliced in two and veneered onto the chimney seen on the right.


The evolution of materials within the project show a overall effort to use what is available. This is an important part of an ecological/permacultural approach to building or renovating. It comes from the idea that any new materials involves harvesting and work creates a greater impact on the environment. So a first and important consideration is within the realm of material observation/assessment. From there, you need to know what you want to create. This brings up many opportunities for creative design which facilitates a dynamic process.

Here, you can see a sound berm along Route 14 created by debris consisting of plaster and unfinished wood that would otherwise be hauled and landfilled or burned. It is important to make certain you are not burying any toxic materials in this type of recycling. That includes plastics; metal; materials with chemical additives such as pressure treatments.

Ecological renovations (transformation/transition) start with what is existing and change form and materiality in an efficient process that takes advantage of what is there. Ecological transformations are essentially a change in design that utilize basic materials in ways that create more connected and durable relationships with the environment. ETs do not rely on outside inputs and machines to drive and maintain conditions.

Considering the difference between renovating and building new in terms of impact, transformational thinking with regard to development can make a big dent in our overall impact on the environment.

Friday, December 16, 2011

SBF# 15 Air sealing details

on the Pella windows I used Siga corvum 12/48 tape to connect the window frame to the foil face of the iso foam and Siga Rissan tape to the interior frame. Drywall gasket will be stapled to the tape and sealed to the drywall around the window. The Siga tapes are amazingly sticky. The Rissan tape is also stretchy to make good seals at the corners. It also has a mesh reinforcement.
This is the Siga 12/48 Corvum tape showing the 12mil section that is folded back to easily connect to the side of the window frame. The 48mil section is peeled and stuck to what ever surface you have next to the window frame. In this case the iso foam.


Here is an air barrier carried over the top plate of an interior bearing wall with gasketing to seal the drywall to.

The drywall is gasketed at all edges. At the bottom plate, a gasket is sealed to 10 mil vaporblock, which is carried to the basement.


This detail seals the beam penetration to the frame and used the drywall gasket to seal the drywall around the beam.

More air seal details to come....

SBF# 14 Granite chimney


The chimney is complete with the granite facing from the barn foundation.
The slabs were cut in half at a local granite shop and mortared and tied to the chimney.

Friday, November 11, 2011

SBF # 13 Heating & Ventilation come together

I believe that everyone is on board for the basic heating and ventilation systems.

Their current plan is as follows:
Heat- Primary - Margin wood cook stove
Backup - Electric element powered hydronic radiators(size to be determined) that would pull from upper coil in a Wagner 105gal tank.

Hot water - Wood cook stove direct to tank/solar to bottom coil in tank
Backup - Electric element

Ventilation - 2 bathroom exhaust only fans(Whispergreen/Fantech) on Grasslin intermittent timer and a kitchen exhaust with 4 Aldes passive inlet vents and a dedicated stove supply.

We decided not to use the spot ERV's because they operated as "exhaust only" for most of the time when it is cold when they will primarily be used, so the extra cost doesn't seem worth it. This fan might work better in a more temperate climate. It was a tough decision to give up the efficiency of the whole house HRV for the simplicity and economy of the passive vents.

The AC part of HVAC will be passive, using shades and manual operation of windows. The earth coupled basement will also contribute to cooling.

Below is the schematic from Karl Rosengrant, who works with Greenworks Solar. Probably the most interesting part is the controller on the radiant heat dump loop that will supply heat to the bathrooms and kitchen to keep the plumbing warm when the wood stove is out. The controller is connected to the solar controller, which has a read on the temp in the tank. This allows the controller to turn on the heat dump based on both the temp in the bathrooms/kitchen or the temp of the water.

Saturday, November 5, 2011

To my grandpa - 4 generations


I still remember first hearing about solar panels and radiant heat from my grandfather. He is the builder that my father and I came from, and now my son. And then there's my stepfather's early career as a carpenter.

I am always amazed at the skill and understanding that is developed over generations when it is passed on through families from birth. Although our family didn't have a family based business, I have spent months and years working beside my father, grandfather and stepfather. This is the foundation of my experience. My earliest memories are of watching them work, learning how to operate shop tools, hammer nails and cut wood. Growing up in my stepfather's shop, I became familiar with how to shape, join and bend wood to achieve whatever was needed.

My father joined the carpenters union in Cleveland, Ohio and then became a chair maker. He built his house based one of Frank Lloyd Wright's circular passive solar designs. I was honored by him with grandpa's plane you can see above and will one day pass it on to Pan, who already has an instinctual hold and position with all of my tools.

Thanks grandpa, and here's to you. Did you ever think your great-grandson would be workin' your plane.

Saturday, October 22, 2011

SBF #12 Heating system


The Margin Flame View cookstove is on site. With a thermostatic damper on the combustion air supply, that will be ducted in thru 3" pipe to the dedicated air intake port.
Small fans will be located in wall ports to move the hot air from the east side of the house to the west. 2nd floor vents will let the hot air up to the 2nd floor.

This constitutes the primary heat supply.

We looked at a heat pump to be backup, but with a price of 10K for primary capacity, it did not fit the budget. The basic idea here is to spend more on insulation and less on heating.

The owner decided he wanted a backup that would keep the house from freezing and protect from any damage. He figures the house will be maintained by a friend even if they are gone and to be able to drain all systems if there is a prolonged absence.
Looking at the heating system again, it made more sense to think about how we could take advantage of the heat dump for the hot water system and combine that with a backup for both hot water and heating. So I began to look into radiators that could bring extra heat from the hot water system and be supplied by an electric boiler if needed.
This preserves one of the primary goals of limiting any possible fossil fuel use, to the grid connection.

One draft heat loss analysis gave me a loss of 15,653 Btus/hr and then you might add 20% to account for coldest situation. The goal is to use less than 1 chord of wood for the heating season.

This can only be verified after a season of use. Stay tuned.

With heat loss we also have heat gain from windows/people/equipment as well as thermal storage capacity. I do not have numbers on this currently and the woodstove is probably oversized, but serves mutliple functions well. Having all the numbers would help more precisely size the heating system. As the owners were set on the wood cookstove, it was just a matter of the amount of wood to be used.
A more appropriately sized heater would have cost less.

By the way we removed a Peerless oil furnace, two 275gal oil tanks, a parlour wood stove and a bathroom electric heater.

SBF #11 - Ventilation/AQ


This post is likely to be controversial.
Against the recommendation of Andy Shapiro, who likes whole house ventilation. We will probably install 2 Panasonic FV-04VE1 Spot ERV's with low(66% @ 30 CFM ) efficiency and with max. 40 cfm each.

From panasonic:
WhisperComfort may also be suitable to meet whole house ventilations requirements under ASHRAE 62.2.


The American Society of Heating, Refrigerating and Air Conditioning Engineers (ASHRAE) set a standard for whole house ventilation, requiring that continuous mechanical ventilation be 7.5 CFM per bedroom (master bedroom x 2) plus 1 CFM per 100 square feet, with sone level not to exceed 1.0

Sunnybrook Farm: 2 beds + 1600 sq feet =38.5 cfm

We also are knocked out of Energy Star rating because we will not have kitchen exhaust(because there will be an electric stove, maybe with recirc. filter) and the ventilation is not above 50cfm. Again, the Panasonics are rated at 40cfm.

Reasoning-
1. The owner doesn't like the idea of installing all the ductwork for whole house system. He would prefer to open a window.
2. The house is small enough to get decent exchange with the two spot ERV's in the bathrooms.
3. The cost installed will be less than half of a whole house system.

We will also be supplying the woodstove with dedicated air supply with a thermostatically controlled damper on the intake.

The root cellar will also have thermostatic controls for ventilation.

It will be interesting to see how the blower door test turns out. If we are below 1ACH50, I think it could be useful to monitor the AQ. Check back for results.

I believe this design is only possible with a house that uses non-toxic finishes and materials that utilizes a free water vapor (or breathing) wall design. This means no vapor block in the walls/cieling. The air barrier must therefore be of a material that can allow water vapor to pass through but virtually no air to pass. We will be using 5/8" sheetrock. Clay and lime plasters also work and there are wood fiber boards that can do the same trick.

Friday, October 21, 2011

SBF#10 Windows are ordered


We decided on Serious fiberglass 725/525 series casement and awning windows with Pella wood clad "Natural Sun" windows on the south dining and den walls for the feel of wood.
Favored "H"(high solar gain) windows on the south/east and west and "L" to the north.

Specs:
Serious: double pane with heat mirror suspended film
Casement 7L : uframe-0.17 shgc-0.32 - North side
7H: uframe-0.19 shgc-0.56 - West/East side
Fixed 5H: uframe-0.18 shgc-0.57 - South side
Casement 5H: uframe-.22 shgc-0.57 - South side

Pella: double pane
fixed: uframe-0.30 shgc-0.56 "Natural sun" glass - south
casement: uframe-0.32 shgc-0.48 "Natural sun" glass - south
awning: uframe-0.29 shgc-0.27 "Advanced Low e" glass - 1 north window

29 windows for under $20K, spent a little more than budgeted(OK 27% over)
But not bad considering quality

Other considerations:
Fibertec -2nd(almost went with them- longer lead time did it, I think)
Thermotec - 3rd(too expensive for budget)
Optiwin-Energate-Linwood and more.

Now the doors....................
Linwood from Maine gave a decent quote for insulated wood entry door with 1/2 glass, multipoint latch and double gasket seal.
Looking at another local millwork shop in Barre, Vermont.
Hope to decide this next week.

Thursday, September 1, 2011

SBF#9 What makes it a Deep energy retrofit.

In the last couple years this element has really become an interesting challenge for me. After a couple of years of immersing myself in energy geek world, I get to bring a lot of retrofit ideas together with a lot of freedom because of the depth to which we gutted the farmhouse. Interestingly, the old balloon framing style has helped with the fact that we are leaving the exterior skin on and insulating to the inside, which is typically the least favored option in terms of how to add insulation to the walls. I should say that this retrofit favors natural materials over petrol and chemical based ones.

So a deep energy retrofit for me means increasing energy efficiency by over 75%. To achieve this we are installing:
1. a continuous air barrier - ADA-sheetrock on the interior.
All electrical on exterior walls will be run on interior of sheetrock in wood chases.
2. 12" of cellulose in the walls(R42).
3. R20 on the foundation perimeter and floor.
4. A thermal envelop that minimizes thermal breaks.
5. R5 or better windows.
6. R80 ceiling with cellulose.

The energy analysis will be done under the mentorship of Andy Shapiro who will be bringing many years of experience in understanding the modeling of energy and moisture in the new design in order to make a predictable outcome.

The goal of the deep energy retrofit is basically to reduce the energy consumption of the house as much as possible with a modest budget through intelligent design to remove a dependence on fossil fuels, reduce carbon output and to conserve resources. We will track metrics such as the tightness of the house once we have completed the envelope as well as yearly use of fuel and power. The Passive House model is attractive, but not quite the right fit for this project. I believe the owners need to be 100% behind that kind of a focus. It will certainly inform much of the design. Passive and low impact design are a top priority for my design process in general. One of the things many people misunderstand about passive design is that it relies most on people's behavior more than the actual design. This means it will be much more difficult to design our way out of our current crises than to change our behavior.

We also see this project as a transition town model for sustainable design. This means there is no reliance on fossil fuels in the design other than through the electrical grid. It also means there is an integrated design that includes ecological processes such as food production and nutrient recycling with a composting toilet and greywater system.

Heat will be from passive solar and wood with an electrical heat pump for backup and hot water will be supplied by the cookstove and solar panels. PV panels will eventually supply electric power.

There is also provisions for food storage in the root cellar and a cold pantry. The greenhouse will extend the growing season to support a healthy homesteading operation for food production. Rainwater catchment will also passively support irrigation in the well drained soils rather than rely on the well pump.
The crew.

SBF #8 Sunnybrook farm design comes together


The design has evolved nicely as we have spent time disassembling the farmhouse. This time allows us to see all the perspectives and sit with ideas for several days.
Some of the conceptual overtones that we have been working with are traditional farmhouse (imagine that) with a touch of modernity. Another term that has come up is rustic elegance.
Some important ideas for me in this design is using what we have, and simplifying. Which means what ever we can recycle including sinks/toilets/copper/electrical fixtures and wood. It also means some really nice wood and granite from the barn. And it means other local materials from nearby.

In this view into the kitchen, you can see the reused barn beams and post.


This view looks into the Living/Dining room.
At the far end you can see the bedroom and Den which will have the hardwood floors that were retrofited some time ago. In simplifying we have removed the front porch and reduced the number of rooms by 2, removed a chimney, one vent stack and the kero boiler with all the baseboard.


The 2nd floor will be largely similar to the original layout. We will refinish the original wide pine floors throughout the second floor, except maybe in the bathroom where it looks like we might have tile.


Some of the more interesting details include a dumbwaiter rootcellar; the granite veneer chimney and interior stone window sills.
The greenhouse and outdoor kitchen are last to evolve. More to come.....

SBF #7 The Barn is Recycled

Here are two tie beam solutions to join to the wall.
The older half of the barn used a lap joint onto the rafter plate which is holding up great.
The newer half decided to tenon into the top of the post below the plate, this resulted in a major blowout on the two middle posts, as seen below.


The siding is coming off well as Aliza and Donnie deconstruct the skin first exposing the frame. The typical two layers of siding include the 1/2" inner layer and the 1" outer layer which is painted red and has gotten a beautiful patina over the years.

Still not sure where the siding will go, but the lower section looks promising as wainscote.
The frame will be used for structural beams in the Kitchen and Dining/Living Room. We will also use some pieces in the Kitchen floor and the outdoor kitchen.


Monday, August 15, 2011

SBF #6 What we found in the old farmhouse.


The gypsum plaster was put on after the window trim, adding over 200 ft of potential air and water leakage. The prodigous amount of air leakage is known for preserving the wood frame in old buildings that spent over 5 and 10 cords of wood heating. The current air barrier scheme is to use ADA. (Airtight Drywall Approach) Gasketing the planes to each other. Dense pack cellulose will also slow down the air and water, and effectively store some water as a heat sink during the winter.


The timber stud frame was balloon framed on the eave sides which are north and south. In the original house, the studs go two feet above the 2nd floor up to the rafter plate and on that sit 2x7 rafters on a 12/12 pitch. Floor joists are nailed to a floor ledger nailed to the inside face of studs with floor beams, square-hole joined to 4x10 stud-posts.
In the add-on kitchen here to the left, the rafter plate is closer to the 2nd floor. You can see the joinery here.


One of the issues with deep energy retrofits is that typically it is advatageous to add the insulation to the outside because of ease of creating a continuous insulative envelope and air barrier. This often makes sense where the exterior siding needs replacing.
In our case, the farmhouse exterior siding is in good condition. And knowing the cost of residing, I was thrilled to find the balloon framing from the interior that will allow us to build a continuous space for the cellulose to cover the outside edge of the floor ledgers.


And here is some of the wood lath that was spit from a board with a chisel. Seen sideways.


The Barn Revisited

I took some time and climbed into the upper frame of the barn. You can tell it was built in two sections by the side by side posts and rafters in the middle. 4 bays each side. The older side is closer to the house and has hand hewn tie beams and a few hewn rafters as well as a ridge beam. The newer side has no ridge beam and the tie beams are tenoned into the posts below the rafter plates. This has lead to the two posts in the middle of the newer half to split at the tie beam peg holes and mortise. The round rafters have pushed out over many winters splitting the posts about 3 feet down. Figuring they would need to be replaced and the subsequent costs we thought it would be easier to take down the newer side and leave old barn even though we really wanted to bring the hand hewn timbers inside.
The older barn side's tie beams were joined differently, by lapping onto the top of the rafter plate. The posts were intact, tenoning into the bottom of the plates.
It seemed more appropriate to leave the older frame that would last longer. And I realized that I should pass on the timbers from the old River Run. This would allow us to use some hewn timbers in the rebuild and be able to continue to see the hewn timbers in the barn.
The beginning of the renovation of the barn is underway.

Tuesday, August 9, 2011

What to do with the old barn?


The old barn frame is similar to the house. A combination of hand hewn spruce timbers with sawn ones. This was common in the 1870's as mills made sawn lumber more accessible. The long timbers were cheaper and easier to hand hewn while the shorter ones were sawn.

We are very interested to use the antique wood, especially hand hewn, in the retrofit of the house. But there is also a need for the barn space as Wayne is already working with a local CSA to share the barn space for overwintering animals.

Wayne wants a more practical space for storage and garage. The compromise seems to be to dismantle the older half of the barn for reusing wood while saving the newer half and renovating it to be more useable for current farm needs.

Week 3 at Sunnybrook


With a great crew and a few extra helpers, the farmhouse is almost gutted.
We have left the frame, the exterior siding, the plastered ceiling in the 2nd floor, one chimney, one plumbing vent and the hardwood floors downstairs.

We have also left much of the back-plastering that was done on the inside of the exterior sheathing, which are 1x wide pine/spruce.

We are now working on completing the design of the space and the energy systems. The energy work will be done with the mentorship of Andy Shapiro.

One of the highlights of the past week was finding a post card announcing the art opening of a friend and neighbor from 1982! I was able to return the card to her delight.

The frame was mostly in very good condition except for the basement ceiling. There is quite a bit of powdering of the spruce timbers. Amazingly, the timbered sill that sits directly on a granite foundation is mostly in great condition. I found only one spot where there is rot where it abuts an exterior porch that sat on original granite footer. The original posts are apparently gone with steel lolly columns that have inadequate bear plates and one column is in such a state of decay that is has crumpled at its base. The only section of frame that was in obvious need of repair were 3 joists underneath the bathroom tub/toilet. Other sections may need extra support/replacement.
The roof is in good condition with only an old rotten remnant of a chimney opening, long taken out. The original wood shingles lie under asphalt shingles, soon to be covered with standing seam.

The management of materials has been a good challenge. We did not order a dumpster and instead are using a trailer to haul to the local transfer station. This makes us more aware of what we are throwing away.
We are saving all framing lumber from walls to be reused as dried wood will have the least impact on an old frame as we rebuild.
We are using the old plaster, broken bricks as the base of an earth berm to shelter from the nearby road.
All of the old lathe is stored for kindling-probably 10 years worth.
Any unpainted wood that will not be reused will make up a summer bonfire.
Unuseable painted wood is hauled away.
Decent wood trim will be saved until we know if we can use it or not. Including door jambs and kitchen counters.
We saved a few built in cabinets to be reused.
All light fixtures, tub,fridge, washer,dryer, dishwasher, stove, oil burner, hot water maker, woodstove, kitchen counters, pergo flooring and baseboard heating will be either sold or sent to the ReStore in Barre.
We will reuse the sinks, any good romex/electrical fixtures and much of the old copper plumbing.
All of the old wiring, including knob and tub, will be recycled.

Renovation tea

As we have been working in a very dusty environment for about 3 weeks, I wondered what my doctor(my wife Adrienne of Green Mountain Medicinals) would suggest for a tea blend to maintain good health in this situation.

She prescribed this herbal concoction:
Echinacea
Ginger
Dandelion root
Red clover
A mint(spearmint, peppermint, applemint)
Mullein

Wayne promptly got the ingredients and has reported the tea as not only good tasting, but revitalizing.


Monday, July 25, 2011

2011 Solstice Fire Structure

SBF #2 - Plans-Existing

Original Plans:
Basement-
The foundation is granite to the timber sills and look in decent shape. The foundation did not seem overly wet even through the flood of 2011.
There is a spring box from a spring on the property that apparently is not in operation. There is also a water softener.
Typical septic and field.
The house is heated with a peerless oil boiler through baseboard. There's an old wood heater in the basement with a few metal flues and there are two chimneys.

Round floor joist under the east wing that are in good shape.
Hand hewn spruce beams in the main section that have some powder post beetle action. Several wood and steel posts have been added with inadequate bearing plates. Not sure what happened to original posts. There is a retrofitted concrete slab.
Second Floor- Open attic over the east wing. Sawn and notched spruce rafters in good shape. The rafter plate is exposed and also doing good.

First Floor - There is a combination of sawn and split lathe and plaster on exterior and original interior walls and ceiling. No insulation.
Studs run sideways with larger sawn posts that always fit the 4" wall width.

Friday, July 22, 2011

Sunnybrook Farmhouse Deep Energy Retrofit


We are one week into the deconstruction and renovation of Sunnybrook farm in East Calais. Wayne and Jan Ohlsson are embarking on the quintessential transition farmstead adventure.

The farmhouse is from the 1870's and has many built up layers of interior finishes yet the original walls still lay empty of insulation and the windows are single pane. The exterior is in good condition and the frame is solid with a combination of rough sawn spruce timbers and hand hewn timbers.

Wayne and Jan are not new to renovations and have developed a basic layout with an old architect friend. The plans include extensive landscaping in the permaculture vien in conjunction with local farmers. Nicko Rubin of East Hill Tree Farm is working with Wayne on the planting layout.
An old barn sits to the south of the house and will be used for materials. There is a need for a smaller barn in the same location.

The plan includes:
- building up the walls 12" to the interior with cellulose
-wood cookstove heat and hot water in combination with solar thermal
-outdoor kitchen
-dumbwaiter rootcellar
-attached greenhouse
-new windows
-reuse of barn for interior finishes
-passive solar design
-new roof with cellulose insulation

Monday, June 13, 2011

Compressed Earth Block- How to make it a reality.


The Cob Cottage Company has made the English/Welsh earth building method popular first on the West Coast of the US and has since spread east.
With much experience with this method I have grown increasing interested in another method of building walls with earth. This includes using a CEB(compressed earth block) machine.
You might think this adds more mechanization to the picture, but making cob as a builder includes the use of a skidster or tractor. And it is possible for the low impact owner-builder to make CEB's with a hand powered block compressor.

The advantages to CEB's are that in the NE, we have precious little drying weather and the CEB's are installed when dry. This means they can be made indoors and let dry and then taken to a building site and erected quickly without the need for drying time.
What has really made the idea jump forward for me in terms of how it could become reality is based on a great project called Open Source Ecology founded by Marcin Jakubowski in 2003 and lead by Mark Norton.
One of their first projects in their Global Village Construction Set was the Liberator. They have posted plans and for a machine that can be build by most machinists/welders/builders. You can view the project here.
Anyone interested to help build one?

Ralph Nader: Koch Brothers Led Fight to Defend Formaldehyde Despite Carcinogenic Evidence


Button4_naderosha

The government has added formaldehyde to a list of known carcinogens, despite years of lobbying by the chemical industry. Formaldehyde is found in plastics and often used in plywood, particle board, mortuaries and hair salons. The government also said Friday that styrene, which is used in boats, bathtubs and in disposable foam plastic cups and plates, may cause cancer. The conservative billionaire Koch brothers have led the lobbying effort against labeling formaldehyde as a carcinogen. Georgia-Pacific, a subsidiary of Koch Industries, is one of the country’s top producers of formaldehyde.

The Book Surgeon


I enjoy sharing artwork that I find really stands out. This is one from Brian Dettmer:
http://www.mymodernmet.com/profiles/blogs/the-book-surgeon-15-pieces

Tuesday, March 15, 2011

Natural Builders Northeast 6th Annual Gathering


Another great gathering of inspiring natural builders was hosted by the Vermont contingent in Northfield. A weekend of pizza and pancake making/discussions/presentations and the most participated in Saturday night slide show event yet.
Of note is the development of the NBNE logo and website which will host a new blog authored by NBNE members.
I have a hard time deciding whether I like the company or the content more!


Here is the old website . Stay tuned for the new format.

Pan begins to communicate


See Pan sign for nursing. Signing gives him confidence and a sense that he can communicate. We have noticed his excitement when making this connection.

Wednesday, February 16, 2011

Farmland Development Ideas

I have been working on a project that combines conserved land, small scale farming and affordable housing.
Here is a project that adresses similar concerns. Not quite affordable though and minus the farming, maybe. This is more like your green upscale suburbia version, unfortunately.
The design shows that there is a bent towards what is "cool" in green design rather than practicality, and you will pay for it.
But ultimately, we need to go further down this path to find real solutions for more people in the vein of solving multiple problems with solutions that turn them into assets.

Builder's Website

Monday, February 14, 2011

Natural Design/Build Joins New Partnership to Keep Vermont’s Working Landscape Vital

Vermont’s working landscape—its open meadows and mixed forests—offers economic, cultural, scenic, environmental and recreational benefits that are essential to our future prosperity. Yet if alarming trends are not reversed, it could vanish within a generation along with Vermont’s unique character and many of the key values that unify the state.

Fifty years ago half of the state’s land was in agriculture; today barely one-fifth is being actively farmed. Forest products mills are closing and production is down. Parcels are smaller, and development is spreading across the countryside.

The new nonpartisan and broad-based Vermont Working Landscape Partnership is leading a bold year-long campaign to keep our farm and forest economy vital. It will bring a focused Action Plan to the Governor and legislature—one that will help everyone trying to make a living from the land. Natural Design/Build is already endorsing this effort and welcomes this new voice in the State House.

It’s important to show our elected leaders how much Vermonters care about this issue. Sign up as an individual member of the Partnership to stay updated and help shape the campaign for the future of Vermont’s Working Landscape.

In December, leaders from the state, federal, nonprofit and private sectors packed the Vermont State House for the Summit on the Future of the Working Landscape. Many of them have already joined this Partnership in support of its Plan. Learn more and add your name to the growing list.

The Vermont Council on Rural Development is leading this effort. If Vermonters focus and work together, we can build an agricultural and natural resource Renaissance and keep our land working for future generations!

Sunday, February 13, 2011

Annular - Timberbuild for the 21st century


http://www.fourthdoor.org/annular/


Fascinating reports on Northern Europe's cutting edge of using wood and modern technology in sustainable ways.
Worth a look.

Monday, January 24, 2011