Wednesday, February 8, 2012

SBF# 20 Escaped heat


How can you tell if your insulation and air sealing is effective?

On this cold morning there was a frost on the roof. And where heat was getting through, you could see the frost melted. I caught this shot this morning after it was noticed a week earlier.

So what is going on here?

The melt spots are where the hallway wall meets the top of the sloped ceiling and the flat ceiling on the 2nd floor. On further inspection, I found that the top plate of this wall actually penetrates the plane of the slope, where on the other side there is no wall and no melted areas.
I also found some air leakage where a piece of tape failed to stick to the top plate.
So the next question is does a little bit of air leakage and a 4" thermal break on an 18" cellulose cavity result in this kind of heat escape or is there perhaps some gap in the cellulose? The installer did check this area with an IR camera, but it was done when we had a much smaller stove and not a large of a temp difference as we currently are running.

What do you think?
I will follow up as we get to the bottom of this one.

SBF# 19 Local, Natural and Reused Materials

Today we made a lot of decisions around using local, natural materials for finishes. Most of it revolved around the kitchen design, which is being coordinated with Eyrich Stauffer of Worcester, Vt.
In order to make design decisions about the materials used for the kitchen cabinets and counter tops, we wanted to coordinate with the other finishes that would be impacted by these decisions and make sure everything worked together.
This included the wood floor, wood trim on the cieling, panelling on the back side of the bar- along the coat shelf and both the closet and book shelf at either end of the kitchen.
Eyrich initially suggested butternut from Vermont Wildwoods that sells Vermont forest salvaged butternut, for the cabinets. Jan liked the look of this wood along with soapstone counters. While Vermont Soapstone used to supply the stone from Vermont quarries and plans to in the near future, currently their stone comes from Brazil. Wayne likes the idea of using a more local slate. We'll see how that turns out soon, but we did come to agreement on using local pine for the floors, and planing the barn boards from the site for the paneling and window trim. We are having a tough time identifying this 100+ year old wood and are thinking in the range of fir or hemlock.
We also decided to resaw some of the old timbers from the barn into countertop material and trim for the ceiling. The tight grain of the spruce and pine is exquisite.

We found that these woods will create a consistent aesthetic throughout the house and have a similar yellow brown hue that will have a warm and relaxed feel.

Stay tuned for the post on clay plasters in the Dining/Living Room.

Monday, February 6, 2012

SBF# 18 PHPP

I have recently completed a 9 day intensive Passive House Training with Katrin Klingenberg mostly in order to learn the Passive House Planning Package (PHPP)
I am currently using this rehab as an excercise and will post the results. Passive House Institute does have a separate track for retrofits called EnerPHit. If you are interested in this check here http://passipedia.passiv.de/passipedia_en/certification/enerphit.

SBF# 17 Closing In

Most of the air sealing is complete.
The 1st floor is being mudded and taped, the 2nd floor is done. We need to seal the basement and root cellar doors. We are anxiously waiting for our 2 Linnwood, rebated, double gasketed doors. And the 2nd floor joist penetrations need to be sealed. Then we are ready for the blower door.

We did notice some spot melting on the roof where a wall met the sloped ceiling. I found a couple of old wiring holes through the top plate and an unsealed seam. But the melting seemed unlikely with such small air leakage given the 18" of cellulose. Upon closer inspection I noticed the top plate actually broke the line of the sloped ceiling, meaning we have a little thermal break here. I'd say the top plate pushes into the ceiling about 4". I am thinking that a few leftover foam pieces could easily fit between the studs to make up for the penetration.

One sign that the envelope is getting tight is that the plastic in the basement is billowing inward as the wood stove is sucking out the air. We will not notice this once the basement insulation is installed, but we are holding off for now until we do the blower door test.

Saturday, December 24, 2011

SBF# 16 The Art of Transition

Transformation from a Transitioneer.

The idea of renovation these days is perhaps not very fashionable, but is certainly considered more desireable in terms of achieving lesser developmental impact. I will also argue that the outcome of a renovation can hold a much more rich feeling in terms of character and energy.

Below you can see the dismantling of the newer half of the barn, recutting it to fit into its new home in the house, and its new place, replacing some of the load bearing walls to create an open floor plan for the dining/kitchen area.

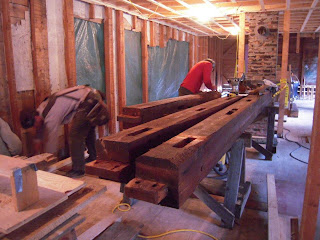


So how do we look and renovation from an ecological perspective. I will briefly outline my process.

First the concept and idea, to transform the old farmhouse into a new home for Transitioneers(http://en.wikipedia.org/wiki/Transition_Towns).

Then it is crucial to have and apply goals:
A place that relies on its local resources gently.Build on/with what we have.
A place that is connected to its ecology greatly.
While these goals may seem simplistic, far too often, goals are not articulated or referenced with regard to major decisions. The resulting decisions often become relegated to the bottom line short term economics or personal whim.

There are many management processes that can be applied to the process. I will suggest holistic management practices as a starting point.(http://en.wikipedia.org/wiki/Holistic_management)
Any process must utilize feedback.

This framework allows me to proceed in transforming a place in an efficient way. Because the process is dynamic, there is a constant need to reassess and question where things go to next and how to make it happen.

Jan had a great idea to map where the original parts of the farmstead started and how they were reused, reintegrated with the renovation. Or not.
Below are a few elements that would be on the map.

Here is the original threshold, flopped onto the ground from its place on top of the foundation. This was removed when we took off the south sun room that was not part of the original house, and made the front door into a window.
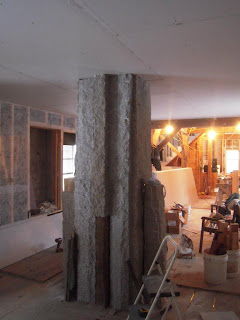
This granite slab was sliced in two and veneered onto the chimney seen on the right.


The evolution of materials within the project show a overall effort to use what is available. This is an important part of an ecological/permacultural approach to building or renovating. It comes from the idea that any new materials involves harvesting and work creates a greater impact on the environment. So a first and important consideration is within the realm of material observation/assessment. From there, you need to know what you want to create. This brings up many opportunities for creative design which facilitates a dynamic process.
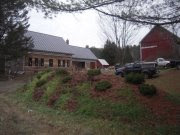
Here, you can see a sound berm along Route 14 created by debris consisting of plaster and unfinished wood that would otherwise be hauled and landfilled or burned. It is important to make certain you are not burying any toxic materials in this type of recycling. That includes plastics; metal; materials with chemical additives such as pressure treatments.

Ecological renovations (transformation/transition) start with what is existing and change form and materiality in an efficient process that takes advantage of what is there. Ecological transformations are essentially a change in design that utilize basic materials in ways that create more connected and durable relationships with the environment. ETs do not rely on outside inputs and machines to drive and maintain conditions.

Considering the difference between renovating and building new in terms of impact, transformational thinking with regard to development can make a big dent in our overall impact on the environment.

Friday, December 16, 2011

SBF# 15 Air sealing details

on the Pella windows I used Siga corvum 12/48 tape to connect the window frame to the foil face of the iso foam and Siga Rissan tape to the interior frame. Drywall gasket will be stapled to the tape and sealed to the drywall around the window. The Siga tapes are amazingly sticky. The Rissan tape is also stretchy to make good seals at the corners. It also has a mesh reinforcement.
This is the Siga 12/48 Corvum tape showing the 12mil section that is folded back to easily connect to the side of the window frame. The 48mil section is peeled and stuck to what ever surface you have next to the window frame. In this case the iso foam.


Here is an air barrier carried over the top plate of an interior bearing wall with gasketing to seal the drywall to.

The drywall is gasketed at all edges. At the bottom plate, a gasket is sealed to 10 mil vaporblock, which is carried to the basement.


This detail seals the beam penetration to the frame and used the drywall gasket to seal the drywall around the beam.

More air seal details to come....

SBF# 14 Granite chimney


The chimney is complete with the granite facing from the barn foundation.
The slabs were cut in half at a local granite shop and mortared and tied to the chimney.